Pork Stroganoff

Mark Brown

August 7, 2022

This is the first of many unplanned entries about food. It’s half recipe, rambling because I don’t actually measure anything when I cook. I just kind of guess, correct, guess again and re-correct. I started a medium size pork shoulder in the oven at 10 pm Saturday night to prep food for Sunday and the rest of the work week. Yes, I don’t mind eating the same thing every day if it tastes good. I lifted about 10 am and came back to the house about 1:30 pm. I found the oven off because they turn themselves off after an amount of time for safety reasons. The shoulder was done when I came back home. And made some white rice and made the pan sauce for the pork shoulder. I initially declared my dish “Saucy Pork” but it is more accurately Pork Stroganoff. So, here’s a list of what’s in it and something of a guide to how I made it.

Pork Stroganoff

Pork Shoulder
1 medium size Pork Shoulder
4-5 tablespoons of coarse kosher salt
1/4 to 1/2 cup of homemade sale free taco seasoning

Sauce
All of the pan drippings, sivved – About 2 cups
1-1/2 cups of water
2-3 tablespoons of no sugar added ketchup
1-2 tablespoons of sweet hot mustard
5-8 second squeeze of honey
1 Tablespoon of corn starch diluted in about 1/2 cup water

Served over white rice and sour cream

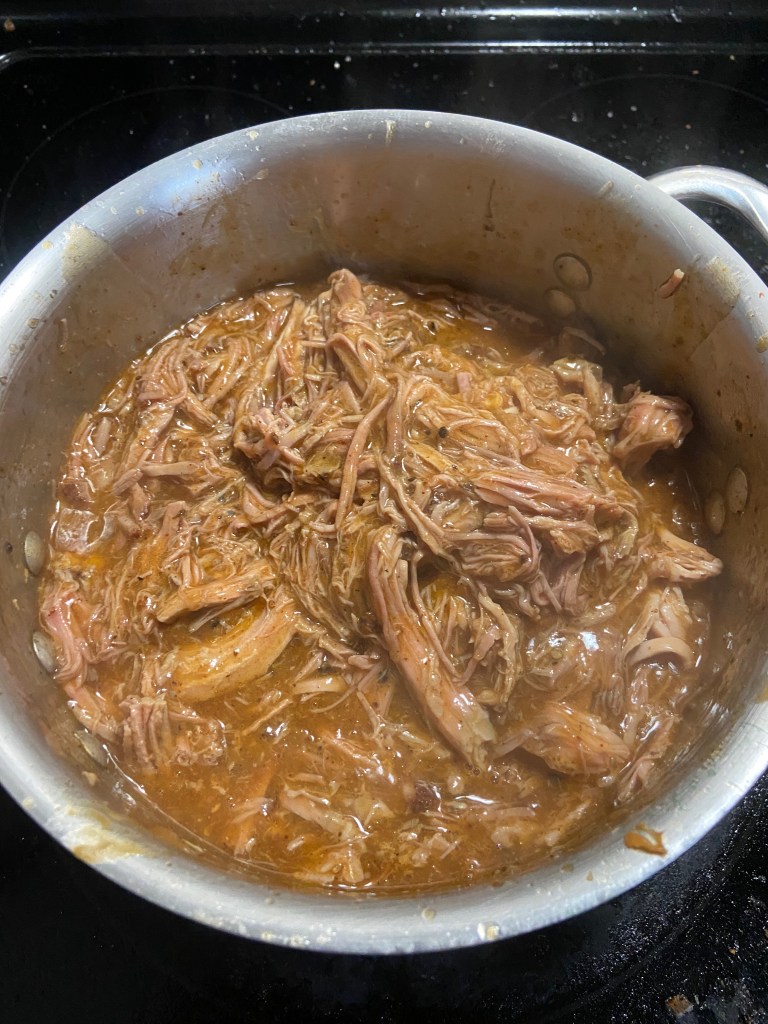
This couldn’t be easier to make. I coated the pork shoulder evenly with the kosher salt and taco seasoning. After pulling the cooked pork shoulder from the oven, I poured the remaining liquid, fat and all, through a strainer to get only the liquid. From there I tasted it to see how salty it was and added the water to dilute it. I added the honey, ketchup and mustard then whisked it together so nothing burned on the bottom of the pan. I let the pot or sauce reduce by maybe 20-25% oh high heat before adding the corn starchy slurry. It thickened up to the proper viscosity in just a few minutes and I let it fully finish to cook out the corn starch. I pulled the shoulder meat apart in long strings and put it all into the sauce and heat up on low for another few minutes until it was all heated through. A true stroganoff would include the sour cream in the sauce but the it’s fine as a garnish.

This is the kind of cooking and food that is stupid easy to learn and execute. It’s very worth it.

Organization Will Set You Free

Mark Brown

August 4, 2022

Every day I walk into work and see an absolute disaster that requires a massive clean up before I can start what I need to get done. It is a clean up that lasts a few hours and requires me to accomplish my task while continuously cleaning because the shift that preceded me doesn’t do much to make it easy to organize without a lot of physical effort. The biggest thing about it that bothers me is that I can almost never act at peak efficiency. I’m working on 5 distinct goals and 4 of them actively get in the way of the 1 that is the higher priority. It’s frustrating but I can’t do much about it, so I work through it as quickly as I can. It all runs smoothly in the end because I make it happen but the lack of organization is just unnecessary. I don’t mind because it all just becomes fuel for my inner fire. I take a serious amount of pride in being able to overcome what is put in my way. That part of my being that goes to the garage/gym also comes with me to work.

Being well organized is one of the biggest keys to the success of any venture, both large and small. It always seems like multiple problems need to be solved at the same time whether we are at home or at work. The best way to get to all of them is to do everything in our power to be doing only the task that is the highest priority on the list. I understand that is far easier said than done. Today I will illuminate some steps in the organization process in several areas and put forward some ideas to help get that done.

The title phrase of this essay wasn’t said by me originally. Alton Brown used it on his show Good Eats quite a bit. I have written about the effect that show has had on my cooking in the past so it shouldn’t come to anyone’s surprise that this phrase would come up. The phrase I had come up with in my head while at work getting through the mess in my work area is “Organization is king.” I think both statements are correct in that they both state the importance of organization in both reality and conceptualization. Brown’s phrasing gives a better descriptor as to what being well organized gives the the person who is, well, better organized than someone who isn’t: Freedom. The ability to stay on task is something that should never be taken lightly by anyone. Getting behind on tasks is one of the easiest things to do. It can just happen on its own, seemingly. The only way to counter wrong decisions and bad luck is to constantly play the game from ahead, so as to take the brunt of the hit and keep going at the same speed. Once again, much easier said than done but it is possible as long as someone’s list of priorities isn’t all over the place, physically or mentally. Everything in someone’s life must be accounted for when attempting to find better organization.

Organization, for the most part, is the lead consequence of planning. The reason for this is that plans have to account for resource accessibility and acquiring when discussing goals and tasks. This is the time and place where people put those resources where they need to be to help the goals and tasks that I just mentioned. Resources here refers to everything from people, stuff, buildings, cars, etc. Everything is a resource. Theoretically, the time and energy in the planning phase should lead to the best possible efficiency towards completing the tasks that complete the stated goals. We know there are a lot of things that get in the way of that. Bad or no communication is the highest on that list, of course. Resources lost leads to wasted time trying to find them. Whether they are lost or found, the negative impact can be felt all around. For businesses, there’s always a fiscal cost to bad organization. If it keeps trending the wrong direction, the company itself could be at risk of failure. Not having enough of specific resources is another reason for low efficiency. People are usually the issue in this case, though stuff, storage and space could easily cause problems. Having enough hands in all the places they are needed is essential to being good as one can be at getting the task completed. Money complicates this because one of the stated goals of any business is to make a profit. That cannot be done with a “whatever it takes” mentality. Lines in the sand have to be drawn and the people who are put in position to do the jobs have to do their task to the best of their ability or better.

Most people in the world have more than one task or goal to accomplish at the same time. This is true for both work life and home life, even if they are mostly separate. Priorities change situationally based on circumstances like time and other people’s priorities. That’s what makes life challenging. Priorities are always bouncing off each other for supremacy at the top of the list. This is what I meant when I talked about dreams being in competition with each other during The Road to Discipline. Tasks on priority lists aren’t any different from dreams in this regard. Everything below number 1 on the list is a distraction, no matter how big or small. The best way to get to a point where someone is only working on number 1, sans the recurring daily tasks, is to eliminate them altogether. Sometimes this requires someone else doing their part to help one do that. Other times the planner themselves will have to figure out how to do it. This is the big challenge of being single. Forging relationships have always been a key for personal and professional development throughout human history for this very reason.

This is where I came back to Alton Brown when the topic of organization gets brought up both out loud and inside my own brain. Good Eats was a show that was all about showing the process of that which the episode was about. There was more food science in the show than just about any other on television at the time. Brown helped the viewer understand more about where the stuff that was being eaten came from and why it needed to be cooked the way it was. There were more than a few catchphrases and pop culture references that repeated through the lifetime of the series. These Good Eats colloquialisms are better understood when one knows a bit more about Brown himself. Before Good Eats, he directed commercials then attended a culinary school because he loved cooking. I can attest that organization in the kitchen really is important to getting a good meal completed. I am 1,000% sure that proper organization was pounded into into his brain by both directing commercials and at culinary school. So when he brings up the french cooking concept of a “mis en place,” the value of proper organization is shown in the light it should be. Mis en place literally translates to English as “put in place.” The thought behind the words is that cooks should have all of their ingredients prepared before they start putting heat to anything. It allows them the freedom to be able to only work on the dish they are cooking instead of being distracted by prepping more ingredients. In a home setting, this can be somewhat forgiven, but definitely not anything above that. What the chef is doing here when properly getting his or her mis en place in order is eliminating tasks completely so there is only 1 of them on the priority list at any one time. When I take this concept and expand it the rest of life, it still holds up to everything.

When I apply organization to strength training, a lot of the thought processes that go into creating a mis en place are fundamentally the same. A lifter past the introductory phase is best served when they are following a program. It helps push the lifter in a specific direction, even if it is just general strength growth. One of the best ways to organize lifting sessions is to think out the lifts themselves using both experience and information from trustworthy sources to categorize them. This will help speed up the learning curve a bit because certain things will stand out over time. By that, I mean years. I’ve written about the session structure of main lift-supplemental lift-accessory lift before so I won’t repeat it here other than to say it is a useful way to categorize and organize any number of lifting sessions. However, it’s not the only piece of the puzzle. Main lifts tend to be technical lifts because they are competition lifts, but that’s not always the case. So, in addition to what I wrote above a lifter should divide lifts into technical lift, strength development, muscular development, and explosive movement categories. There’s possibly some other ones but those 4 definitely help a lifter fill out a lifting session plan. I firmly believe in the 3 week wave strategy. That is when a a lifter changes main lift movements every 3 weeks to help build every lift up over the space of years. What organizing and categorizing does is allows the lifter the freedom of quickly forming a program that adapts to changes inside and outside the gym. This will save a lot of time and quicken the learning process. There’s just as much figuring out what not to do as there is what to do in strength training.

I feel that I should expand on categories of lifts I wrote above. Technical lifts are exercises that are technique driven over all other aspects. What that means is that being technically and mechanically more effective is what the lifter needs to be focusing on rather than how much they can lift. Training these lifts tends to make a lifter better at doing them over being translatable to other exercises. Bench press, straight bar squats, and straight bar deadlifts examples of them. Any major compound movement with a straight barbell is going to qualify. Strength development movements, which are usually supplemental lifts, are designed to focus on increasing the weight or load a lifter can handle when doing those technical lifts, if talking strictly powerlifting. Strongman is a different beast. Muscular development lifts prioritize building the body over becoming better at the lift or getting stronger. In order to do that, a lifter has to be exceedingly deliberate in how they lift, what lifts they choose to do, in what order they do them, and how far they take a set. Going well past failure is the standard effort given level for people who want visually appealing muscles. These lifts are still important for people who care more about the lifts because it does have a positive impact, though. Explosive movements refers to any exercise that is effectively all about power and rate of force. The Weightlifting trio (split jerk, clean and jerk, snatch) is just the start. Box jumps, power cleans, and some Strongman events are all examples. Note that all of these lifts are highly technical in nature but the defining feature of them is their explosiveness.

What one is doing when categorizing the lifts is effectively brainstorming. I know, I know. It’s a radical concept that I just created right now writing this. All jokes aside, brainstorming really needs its own space. If someone tries to do it on the fly, they will run into problems that stem from the work that has already been done but no longer holds benefit to a new plan or goal. Constantly working is how one gets ahead and stays that way. I can’t deny that. Brainstorming while producing work is just inefficient. I would never advocate turning off one’s brain in work or its private time equivalent. This concept also shows its value in long term planning. Long term goals just don’t get achieved without brainstorming unless an absurd amount of luck is involved.

Getting organized allows us to become free to take the next step in whatever plan we developed for improvement. It needs to be treated with the same respect as getting work done. The freedom is gives is both necessary and empowering because it provides a clearer vision for future steps. When proper organization isn’t care for, it usually lets everyone know around them very loudly. That’s normally in the form of a huge mess that takes hours or days clean up.

Equipment Review: EliteFTS Muscle Mace

Bonus Triceps Discussion!

Mark Brown

August 2, 2022

The EliteFTS Muscle Mace is a tremendously useful piece of equipment for any gym. I will explain why through a comparison of triceps pushdown and pulldown options.

Triceps are a muscle group that can be isolated through numerous means that all basically hinge on the same premise. By keeping the elbow still or silent, so to speak, when doing presses, extensions, pulldowns, and pushdowns the 3 muscles that make up the triceps can be isolated. Each movement can be used to target 1 or 2 of the 3 muscles. Any shoulder or bench press will have a secondary effect on the triceps when full extended. That’s why locking out every rep is important. If a lifter can’t keep the elbows from moving during a rep, they can’t successfully isolate the muscle(s) they are after. Silent refers to the ability to keep the joint, the elbow in this case, from moving around during the lift. A “noisy” joint is one that moves on all 3 axes (X, Y, and Z) during a lift. Everybody understands the consequences when it happens on bench press, overhead press, deadlift or squat. Pushdowns or pulldowns are just going to result in the lift being less effective.

Some triceps exercises are used with bars and plates. Presses and extensions are lifts I typically do with ez curl bars or straight bars because they more closely resemble lifts they are accessory lifts for. Machines often use preacher style benches to force the elbows to stay silent. Firm pressure on the preacher bench allows the lifter to use it a source of leverage. Pushdowns and pulldowns are done on machines that use cable tension to adjust the resistance. Attachments are usually connected to carabiners. Different designs will isolate some muscles over others. It’s no different than movements with ez curl or straight bars. I find a non-rotating straight bar attachment is best for pushdown and pulldown movements. Pushdowns would be done with a pronated grip and pulldowns with a supinated grip. The standard lat bar attachment is probably the easiest way to find this. Basic handles are used for unilateral work. They are useful for improving imbalances in muscular development. Right now I do at least a 2-3 extra sets with my left arm on pushdowns because my right tricep is a bit bigger and stronger than the left.

Ropes are a gym favorite for neutral grip pulldowns. They create a different challenge for the tricep movement because hands stay neutral until the end where the hands flare at the bottom on the lock out. As a result, rope pulls are done with less weight and the lock out phase is emphasized. They are best used for hypertrophy work. That’s where the beginning of talking about the Muscle Mace comes in. In many ways, it is a rope made out of a 3 handles. Those handles happen to be metal balls that are old school grenade shaped. The lowest grenade is done like a pulldown. The middle one is about half pulldown and half pushdown. The top one is definitely a pushdown. The ability to do all 3 of those with one piece of equipment is exceedingly valuable. Chances are if someone owns decent lat pulldown machine they already own a couple of different attachments. If they don’t already own the v shaped pushdown attachment, aka pyramid in my training logs, the top grenade is basically that.

What really makes the Muscle Mace stand out is the ability to condense 2 different exercises into 1 one piece of equipment efficiently. They can be done separately, of course, but the giant set from the bottom grenade to the top one is an absolute killer. It is a large part of why I got it. I could easily do these exercises separately, but doing them as a giant set is a much better use of my time and equipment. A giant set is a superset taken up a notch. The latter is when a lifter does 2 different lifts quickly in succession and the former is when do 3 to 4 different lifts in succession. Beyond that, a lifter is getting into circuit training territory. I currently superset the giant set of Muscle Mace with EZ curl bar preacher curls on an arm day and it is ruthless. What makes the giant set so effective is the range of motion decreases with each grenade up the chain. That changes how the lift is effecting the triceps. It is an absolute burner. The major thing to remember is this piece of equipment is best used for hypertrophy work. The goal isn’t to do as many as possible on any of the grenades. It is to to get through all of the them with at least 8-10 reps. That’s what will get that signature tricep burn a lifter gets from going max effort on a pushdown or pulldown lift. Getting 15 reps on the initial third of the exercise isn’t worth getting less than 8 on the last or the second because the tricep is fried for the set. This means that the lifter will have use their training to understand what weight they need to put on the machine, selectorized or plate loaded, to get that giant set done.

There are other ways the muscle mace can be used during a training session. It can be used as a unilateral tricep extension the way a dumbbell would. The difference between the lifts is that the Muscle Mace would be employing the concept of accommodating resistance rather than all of the weight in the hand. That does make quite a bit of difference. They would do this by attaching a chain or how many ever they wanted to the “top” grenade via carabiner and holding the the “bottom” one and executing whatever movement they were going to do, which is probably an extension or JM Press. Accommodating resistance is used by lifters to decrease the weight at the bottom of the lift to help them get better at being more explosive in the first part of a lift. The lifter will only feel the full weight of the lift at the very top of it. A chain needs to maintain contact with the floor to have the effect I described to actually occur. The accommodating resistance also has puts less stress on the elbows during a lift like this because it’s not taking the strain of the weight at the top. I have a set of 2 chains that are 29.88 pounds in weight and about about 6 feet long so the Muscle Mace is perfect for laying triceps Extensions or JM Press. The Muscle Mace itself has enough weight to act as accommodating resistance when connected to a chain on a bench press or squat. That makes the Muscle Mace multi-functional, which should always be a major consideration for anyone buying equipment for a home gym.

Just a few notes left to add to the review about quality and other odds and ends. I can’t see the Muscle Mace falling apart anytime soon. It is a very solid piece of equipment. The connections from grenade to grenade are all very sturdy and welded very well. There is no knurling on them. There’s no need for it. For my money, the hardest grenade to use on the giant set is the middle one. A lifter can still pull the balls apart but it is very much a pushdown. When a lifter does get up to the top grenade, they need to widen their stance to “feet outside the shoulders” distance because the bottom 2 grenades will be swinging around. This is especially true if the lifter is being explosive with the pushdown as opposed to slow and deliberate. If the the swinging grenades hit, it won’t be pleasant. It’s very easy for a male lifter to tap or more their nuts with bottom grenade. I’ve done it. I learned my lesson. It also means being aware of them flying around immediately after a set it done and their movement hasn’t settled. Pay attention!

The Muscle Mace gets a big thumbs up from me. It’s a killer piece of equipment for triceps development. It deserves place in every gym. It costs and $50 and comes as a pair. It has definitely been worth the cost. Good news as well: It’s currently in stock!

2022 Week 30 Training Log

July 25 – 31, 2022

Mark Brown

August 1, 2022

Monday
Scheduled Day Off – Recovery

Tuesday
Cambered Bar Squat – 175 x 6, 265 x 6, 315 x 6, 355 x 3, x 3; 365 x 3, x 3; 375 x 3, x 3; 385 x 3, x 3
Sumo Deadlift – 315 x 3, x 3, x 3; 335 x 3, x 3, x 3
Calf Raises – 335 x 20, x 20, x 20, x 20
Barbell Rows – 185 x 6, x 6; 205 x 6, x 6
Leg Extensions – 110 x 12, 130 x 10, 150 x 10, 170 x 10

Wednesday
American Cambered Bar Press, Inner Grip – 138 x 6, 198 x 3, x 3; 218 x 3, 198 x 3, 178 x 3, x 3
ACB Press, Second Grip – 138 x 6, 198 x 3, x 3; 218 x 3; 198 x 3, 178 x 3, x 3
ACB Press, Third Grip – 138 x 6, 198 x 3, x 3; 218 x 3, x 3; 228 x 3
ACB Press, Outer Grip – 138 x 6, 198 x 3, x 3, 218 x 3, x 3; 228 x 3, x 3
Flat Dumbbell Press – 100 x 10, 110 x 6, 115 x 4, 120 x 3
Seated Overhead Dumbbell Press – 55 x 12, 60 x 10, 65 x 8, 70 x 6

Thursday
Tricep Pushdown, Pronated Grip – 55 x 12, 65 x 12, 75 x 12, 85 x 10
Preacher Curls, wide Grip – 45 x 12, 65 x 12, 85 x 12, 95 x 10
Muscle Mace, Giant set – 45 x 10(x 8)(x 8), x 8(x 8)(x 8); 50 x 10(x 8)(x 8), x 10(x 8)(x 8)
Preacher Curls, Narrow Grip – 95 x 12, 85 x 12, 65 x 12, 45 x 12
Skull Crushers – 45 x 12, 65 x 12, 75 x 12
Standing Curls, EZ Curl Bar – 45 x 10, 65 x 10, 75 x 8
Single Arm Pushdowns, R then L – 10 x 10(x 10), x 10(x 10), 15 x 10(x 10), 20 x 10(x 10), L only: 10 x 10, x 10, x 10

Friday
Scheduled Day Off – Recovery

Saturday
Cleans – 135 x 3, 145 x 3, 155 x 3, 165 x 3( (fail on second attempted rep), 175 x 3, 185 x 0 (2 attempted reps)
Barbell Hip Thrusts – 225 x 10, x 10; 255 x 10, x 10; 275 x 10, x 10
Dumbbell Squats – 100 x 8, 105 x 8, 110 x 8, 115 x 8, 120 x 8
Leg Press – 478 x 20
Cable Rows, Seated Low Pull – 42.5 x 12, 50 x 12, 60 x 12, 70 x 12
Calf Raises, Seated Deadlift Machine – 100kg x 50, 120 kg x 30, 140 kg x 30, 160 kg x 30
Adduction – 295 x 20, x 20, x 20

Sunday
Bench Press, Shoulder Saver Pad – 135 x 6 Normal Grip, x 6 Wide Grip, 225 x 12, 275 x 6, 285 x 6, 295 x 6( help needed to on last), 305 x 3, x 3; 275 x 5
Narrow Grip Incline Press 135 x 6, 225 x 3, x 3, x 3, x 3
Log Press – 141 x 4, x 3; 151 x 3, x 3; 161 x 3
Floor Press – 235 x 6, x 6; 245 x 6, x 3, x 3; 255 x 3, x 3
Rack Pushups – BW x 12, x 12, x 12, x 12

Notes

Apple Watch has been re-synced so steps will be tracked once again on this log. I don’t know what happened but I ended up needing to set everything back on it. It was an interesting couple of weeks without it. I will end up writing about it I’m sure.

I changed the incline on the narrow grip incline press to one notch higher on the adjustable bench. It is noticeably more difficult so there is no reason to put that lift any heavier when doing it that way. Bench press past Sunday was very strong. That’s to be expected using the shoulder saver pad but it was better than it was last week or the 3 week phase before. Definitely showing improvement in the double and trip rep sets.

I have back some discomfort in my back after squatting the last couple weeks so there will be a bit of a de-load this week.

Not Just an Equipment Review: Rogue 13mm Powerlifting Belt

Mark Brown

July 28, 2022

A powerlifting belt shouldn’t be at the top of the list of equipment to get for any lifter for awhile. There is no reason to prioritize a belt unless a lifter is that bad off before they step into a gym. A powerlifting belt will not save anyone from an injury received from a poorly executed lift. What it will do is help limit what damage could have been done otherwise. I know this from experience very well. That just one of the things I will be discussing in this episode of “Not Just an Equipment Review.” I will get into what a lifting belt does, why they are important and give a review of my lifting belt.

A lifting belt really only has one purpose: To support the lifter’s core externally during lifts. This is an extremely important concept for any lifter to understand because it should prevent a slip in either mental or physical processes. The belt, no matter how thick or well placed, will not prevent an injury brought on by bad technique or screwing around. I nearly injured my back badly in 2020 when deadlifting with the belt I currently own. It happened at 315 pounds when my max was around 325. I believe it happened because I tried and successfully did reps at 295 without the belt. That caused my back to be ready to seize up when I went up to 315 pounds. I remember doing 3 solid reps then feeling the pop and seize up just before the lock out on the 4th rep. I immediately dropped the bar. I wondered if I had the belt positioned correctly at the time, but I have determined it wasn’t the issue after looking back on it numerous times over the last 2 years. The belt probably helped save my back from a potentially catastrophic injury, but didn’t prevent what happened. I cannot emphasize that enough. I will probably repeat that multiple times in this entry.

There are a couple different types of lifting belts: Soft belts and hard belts. Soft belts are made of a firm fabric that usually get latched together with velcro. That velcro is the bane of every lifter’s existence. It is necessary but the vast majority of velcro in the world is terrible in terms of quality. It will break down at some point. These soft belts can vary in size depending on who makes them. Evolution Athletic’s Support belt, a soft belt, supports the entire core for example. I have had soft belts that were barely wider than a leather powerlifting belt. Hard belts are typically 4 inches wide and made out of a harder material and wrapped in leather. That fact also leads them to be also known as leather belts. The thickness of hard belts will effect a lifter’s leverage position when doing lifts, especially deadlifts, so there is a bigger learning curve than it sounds like there is. They generally come with different ways to fasten them: Single or double prong and lever. I have never used the latter so I will leave that discussion to someone who has. The belt should be worn at about belly button level, which is the true waist on us humans. Lower than that and the core and lower back won’t be supported. Any higher and it will effect a lifter’s ability to breath the way they need to because the belt will be pressing into the bottom half of the lungs. Learning exactly wear the belt needs to be on a lifter’s body is a matter of understanding basic anatomy and experience wearing it.

The reason why a belt should never be the highest piece of wearable equipment on a new lifter’s priority list is because they shouldn’t be lifting weights that require them. There is no reason to push that hard that fast in the introductory phase. Belts should only come into play during a lifting session when the work that needs to be done for the day cannot be done without it. This can change as beginning lifters become intermediate level lifters. Strengthening the core is one of the highest priorities a lifter has in their program. This is done through mastering breathing and how to to brace for the load. Working without a belt forces the lifter to do this without any external aid. This keeps weights down on lifts and emphasizes technique. The belt can tempt lifters to push weights that are beyond their ability and strength if they don’t remember it will not save them from an injury. Lifting belts are used mostly during complex movements like the squat, deadlift, bench press, and overhead press if talking strictly powerlifting. Strongman, as a sport, puts lifters in all sorts of positions so belts could be necessary for just about every lift that is done. Every lifting session is different and my use of a belt changes with how my body feels on that particular day. I can confidently deadlift from the floor or 3 inches off the floor up to 365 pounds without a belt. Above that may or may not require my powerlifting belt.

This leads to the review part of this entry. I ordered the Rogue Fitness 13mm Powerlifting Belt in July 2020. I did because I needed one to replace my previous hard belt that no longer fit. I hadn’t squatted in a year and half or so at that point so I needed a belt to squat 275 pounds or above. Rogue sells powerlifting belts at a variety of thicknesses. The one I bought is the thickest they sell. I believed it would give me the external support I was looking for. Its learning curve is inline with other hard belts I have used. Getting into position to deadlift was difficult at first. That was through the combination of it not being broken in and my leverage position being poor due to waist size. It took a couple months to break in. It’s very flexible now, but it started out about a stiff as a door. It does a very good job supporting my core during lifts I need it and has aided in protecting from further damage when I needed that. Getting into position when deadlifting from the floor with the belt on is still a small challenge. It was a good investment. I can see myself using it for a long time. It cost $123 but it has been well worth the money spent on it. The belt also tells me about changes in weight and other body changes I need to be aware of.

A lifting belt is a necessary piece of equipment for experienced lifters who want or need to push the boundaries of their possibilities. They will not save a lifter with sloppy technique or one who lifts too heavy from an injury. It can limit the damage done in that case, at best. Learning how to wear the belt when lifting will help increase the bodies ability to lift without one and help understand how to breath and brace properly. Strength training is about making the body able to function without external aid at its core. A lifter can get by without ever using a lifting belt.

Brisket

Mark Brown

July 26, 2022

Cooking brisket was one of my main introductions into barbecue. Learning how to prepare and cook it well has helped me learn multiple kitchen skills I wouldn’t have learned otherwise. All of those skills can be applied to other meats. This has been done many times over. That knowledge is important to me because I know I can reach back into the archives, so to speak, and produce what I did 7 years ago. Learning brisket has been a major touchstone in my cooking life. I wish to pass along some of what I have learned.

This story starts around 2010. I had heard it was the hardest to learn so I went after it. It can be an intimidating piece of meat to cook because it is a big investment and would be feel like such a kick in the gut if it didn’t turn out well. When I started smoking them in 2010, they cost $2.19 to $2.49 per pound for USDA Prime whole briskets at Costco. A guy I worked with who smoked a lot of me barely believed me when I told him that. The “whole” is important because a brisket has different muscle groups in it. The flat is the vast majority of it, is leaner, is a bit drier and has a grain that runs along the length of it. That last part is extremely important when it comes cutting time. A beautifully cooked brisket can ruined if not cut correctly. Cutting against the grain in 1/4” slices pretty dang perfect. The point sits above the flat, is fattier and its grain runs perpendicular to the flat. All told, those muscle groups produce a cut of meat that can be hard to nail perfectly without experience. That is part of the reason why the point cut is cut off the brisket and put back into the smoker to cook more to make Burnt Ends at restaurants.

When it comes to seasoning a brisket, a cook has to be fairly aggressive because beef’s flavor profile on its own is much more in one’s face than pork or chicken. A brisket has a serious fat cap covering the flat in addition to the intramuscular fat. That cap is used by the cook to keep the lean flat from drying out in the cooking process, which is absurdly easy to do. Keeping it moist all the way through to service is a lot of what makes it the challenge that it is. Most of the cuts of beef available in grocery stores, in general, are most tender when cooked to medium rare. That means about 130-140 degrees internal temperature. Brisket gets cooked all the way to at least 185-190. I pull them from the oven or smoker at 177 degrees because I know the internal temperature will keep raising for quite awhile. A piece of meat that size doesn’t cool down fast. That must be accounted for. The meat in a brisket when done is dry, but the fat cap helps it “feel” like it’s moist. Pork shoulders produce the same effect. Sauces are employed to make the meat feel moist in the mouth. The fat plays a role in the way seasoning is done on the roast itself. It produces that “heavy” signature flavor one associates with beef. I have seen many rubs for brisket that include the entire spice shelf, but I use just freshly ground tellicherry black peppercorns and kosher salt. That may sound simple but it’s all the brisket needs. People underestimate how powerful black pepper is because grocery stores don’t carry high quality black peppercorns or pre-ground black pepper. It is a powerhouse spice when freshly ground that can be very, very dominant in a dish. It’s necessary to cut through the fat of brisket. Salt is used to bring out the essence of what is being cooked. Don’t be shy with it it here. A brisket will need a lot of it. How much? I’ve never measured but it’s always more than I think. If a cook under salts a brisket, the flavor will be flat and somewhat muted.

I have cooked brisket using 3 different cooking methods and enjoyed all of them. At least half of the briskets I have cooked in my life were just smoked. My heat of choice is a hardwood chunk charcoal because it is consistent in temperature and burns completely to ash. I prefer to smoke with cherry wood chunks. Chips will do fine but chunks last longer, especially when soaked. I don’t soak them all the time. Unsoaked wood chunks and chips produce a different smoke when used. The easiest way to put it is that soaked wood produces a “softer” smoke than unsoaked wood. It’s fascinating what different processes bring out in the same organic material. It does take 10-12 hours to get done, especially for briskets in excess of 15 pounds, when cooked below 250 degrees. That has been an impediment to making them often since I moved into my house in July of 2016. That is a long time to maintain a fire. Automated feeder smokers have become more popular over the last couple years for that very reason. I consider it cheating, but that’s my pride of learning how to maintain a low fire for long periods of time well coming through. I typically pull the brisket from the smoker after 8 or so hours and finish in the oven because it just needs to finish cooking at that point.The smoke fills the air so be ready for it. Starting the cooking process from fridge cold will just add time that isn’t necessary.

Yes, this is a pork belly. No, the process isn’t different for the brisket.

The second method I have employed is to cure the brisket using a a corning spice mix. I This is my favorite way to eat brisket. It also requires a bit more learning and experimentation to do. I have seen cooks on television shows get the process of curing meat done with a brine. A dry cure will work just as effectively as a brine. It is the same thing minus the water, after all. The issue with a brine for a piece of meat as big as a brisket is the space the container would take up in a fridge to do it. Restaurants have coolers so such large containers and regular houses don’t. The way I get around the space problem is to use sealed bags to put the brisket into, put the salt and corning spice on it after working the meat into the bag (which is absurdly hard to do) and then seal the back up with a vacuum sealer machine. There’s a couple different reasons for this that goes beyond saving space. First, removing the air from the bag will help the salt and spices get into the meat.The salt allows the spices to become a more prominent flavor come eating time. Second, the sealed bag makes it more convenient for the cook to use it when enough time is had to cook the meat. There is a point of diminished returns but it’s not for quite a few weeks. More brine builds in the bag with each passing day the meat is in the sealed bag. It will make the meat saltier as a consequence. That’s why there are diminished returns on the end product. Salt is easy to put into food but hard to pull out.

There are two primary ways to cook the brisket after the cure has been completed. If it cooked in either water or braised, which is a way to roast with both moist and dry heat, the end product is called Corned Beef. Crazy, I know. I’ve only made this a couple of times. It has come out exceedingly good every time. The corning spice adds a layer of flavor that beef itself doesn’t have. When a corned beef is smoked, it is called Pastrami. This is where the money is at for me. The curing process allows me to experiment with flavors in ways others can’t. Making pastrami hits both cooking interests. Corning the brisket does allow the meat cook in less time. It doesn’t known down the cooking time a lot, but it is noticeable. The reason for the time difference is that water has been pulled out of the meat by the salt in the brine so it goes on the smoker at less than package weight. The difference between a 16.5 pound brisket and a 13 pound brisket is more than it sounds like it is. Cherry remains my smoking wood of choice because I like the flavor and the smoke ring is so, so pronounced. I have experimented with various time tables on curing briskets. I typically corn them for weeks at a time. The cure that tasted the best was on the meat for 5 weeks inside the bag. Is that length of time patently absurd? Yes, but it was easily the best food item I have ever made. It was the exact right level of salty with flavors that evolved for a couple of minutes after eating a small piece. I put a lot of money into it. All told, it probably cost me about $85 to do it. Part of what was amusing about it was that I started with a 16.9 pound brisket and ended up with only 9.6 pounds of finished product. The weight loss comes from a drop in water weight. Water’s main role in cooking is to dilute whatever seasonings or flavorings evenly. Removing it intensifies flavor. Removing 43.4% percentage of the water amped up all of the other flavors by that much. When I experimented with a 7 week cure, I found the final product was too salty to continue eating. It was an expensive failure. The lesson is that the curing process for a brisket experiences diminished returns between 36 days and 49 days. I’ve never forgotten that.

I would be remiss if I didn’t talk more about the flavoring agents. My corning spice isn’t much different from a commercially available one. Mine doesn’t tend to include the Juniper Berries that are typically in them but has most of the rest. Using fresh, whole spices is key for the success of any curing process. They will bring the most flavor to the end product. Most corning recipes will use a “pink” curing salt to give a pink color to the final product. It is there to help make the meat pink through the use of nitrates and nitrites in the salt. Celery Seed produces nitrates that help with the same thing so it is always in my spice blend. My choice of salt is just regular pickling salt because I don’t care about the pink color. Pickling salt is an extremely salty salt. That sounds really stupid to say, but different salts have different saline levels. I’d have to use triple the salt or more for the cure if I used my normal kosher salt. Pickling salt is just that potent and minuscule in size, comparatively speaking. When moving to the smoking process, the corning mix has to be washed off the brisket. That also gets rid of the salt on the outside layer of the meat, which is extremely important for not making it too salty. After the surface has been dried off, I apply a seemingly aggressive amount of freshly ground black pepper like I would a non-corned brisket. Remember to not put any more salt on it. That final layer of pepper is the final layer of flavor that makes pastrami the king of deli meats. There are about 5 layers of flavor going on in a single bite of pastrami. It’s kind of in this order: Beef, fat, cure, smoke, pepper.

The last way I’ve cooked brisket is by cooking it directly in water. I was inspired by a dish I saw on Diners, Drive-Ins and Dives. It was a Mexican pulled beef. I learned some things about brisket I didn’t know when doing that recipe. The use of water as a cooking method drastically cuts down the cooking time down to just a few hours. It creates a beef broth at the same time that can be used as the base of a sauce. I used dried chile peppers to spice up the broth. The most interesting thing I learned from this dish was the way the brisket shredded the way a pot roast would. The difference is that the brisket shreds were close to 3 or 4 times the length of a chuck roast. That has given me ideas on what I can do with that lesson but I’ve never followed up on it. That pulled beef was probably 5 or so years ago now. It’s definitely worth doing again.

The primary thing that keeps me away from brisket these days is cost. I stated earlier what the cost was per pound back around 2010-13. I don’t know how the price has changed at Costco since I haven’t been a member there for years now, but I’m sure it would have had to rise since then. I don’t think a singular cut of meat would be the exception to the rising tide of prices. Brisket has always been more expensive at grocery stores than at bulk stores. I have to think some of it comes from the fact that it is less in demand than steaks, ground beef and other roasts. Brisket flats are more expensive per pound than briskets with the point still on because butchering was done to take it off to package just the flat. I never bought any brisket under 15 pounds under the premise that there’s better chances of more lean on bigger briskets. That’s especially necessary when curing it. I remember briskets of that size costing me somewhere around $40-45. I see them regularly in the $75-85 range now. That’s a large price gap in 10 years. Some of that is bulk pricing and some of it inflation. It would be hard for me to nail the exact ratio in the cause there since I’m not really in the game anymore.

Brisket is worth learning how to cook because it feeds a lot of people at once or a few people for a long time. It just takes a bit of practice to really get the hang of. The price can be a bit prohibitive, but part of growth in the area of cooking is experimenting and seeing what works and doesn’t. I remember both the 5 week and 7 week cured pastrami because they were both very instructive. I hope this entry has been helpful in understanding what can be done with what can be a daunting piece of meat.

2022 Week 29 Training Log

July 18 – 24, 2022

Mark Brown

July 25, 2022

Monday
Scheduled Day Off – Recovery

Tuesday
Box Squat, Cambered Bar – 175 x 6, 265 x 6, 315 x 6, 355 x 3, x 3; 365 x 3, x 3; 375 x 3, x 3
Sumo Deadlift – 315 x 3, x 3, x 3, x 3, x 3
Barbell Rows – 185 x 6, x 6; 205 x 6, x 6
Calf Raises, Yoke Bar – 335 x 20, x 20, x 20, x 20
Leg Extensions – 110 x 12, 130 x 10, 150 x 10, 170 x 8

Wednesday
American Cambered Bar Press, Inner Grip – 138 x 6, 198 x 3, x 3; 218 x 3, 178 x 3, x 3
ACB Press, Second Grip – 138 x 6, 198 x 3, x 3, 218 x 3, 178 x 3, x 3
ACB Press, Third Grip – 138 x 6, 198 x 3, x 3; 218 x 3, x 3; 228 x 3, x 3
ACB Press, Outer Grip – 138 x 6, 198 x 3, x 3; 218 x 3, x 3; 228 x 3, x 3; 238 x 3
Flat Dumbbell Press – 100 x 9, 110 x 6, 115 x 4
Seated Overhead Dumbbell Press – 55 x 12, 60 x 12, 65 x 10, 70 x 8
Lat Pulldowns – 90 x 12, 115 x 10, 140 x 6
Bent Over Rear Delt Rows – 10 x 20, 15 x 20

Thursday
Tricep Pushdowns, Pronated Grip – 45 x 12, 55 x 15, 65 x 15, 75 x 15, 85 x 12
Preacher Curls, EZ Curl Bar Wide Grip – 45 x 20, 65 x 20, 85 x 15, 95 x 10, 105 x 8
Muscle Mace, Giant set – 45 x 10(x 8)(x 8), x 10(x 10)(x 110), 50 x 10(x 8)(x 8), x 10(x 10)(x 10)
Preacher Curls, EZ Curl Bar Narrow Grip – 105 x 10, 95 x 15, 85 x 20, 65 x 20, 45 x 20
Seated Overhead Tricep Press, EZ Curl Bar – 45 x 15, 65 x 15, 75 x 12
Standing Curls, EZ Curl Bar, Wide Grip – 45 x 12, 65 x 12, 75 x 12

Friday
Scheduled Day Off – Recovery

Saturday
Unscheduled Day Off – Recovery

Sunday
Bench Press, Shoulder Saver – 135 x 12, 225 x 12, 255 x 6, 275 x 6, 285 x 3, 295 x 3, 305 x 2, 295 x 2
Narrow Grip Incline Press – 235 x 3, x 3, x 3; 245 x 3, x 3, x 3
Log Press, Strict Press – 141 x 3, x 3; 151 x 3, x 3; 161 x 3, x 3 (push press)
Seated Tricep Press – 45 x 12, 65 x 12, 75 x 15, 85 x 15
Standing Bicep Curls – 45 x 12, 65 x 10, 75 x 10, 85 x 8
Floor Press – 235 x 6, 245 x 6, x 6; 255 x 3, x 2

The Soul of the Artist

Disconnect and Damage

Mark Brown

July 21, 2022

Something has happened with my eating habits over the last year or so. I know the source of the change. Strength training took over my lift mid-2020 and has absurdly hard grip on me. It’s fair to say that everything I revolves around gym work. Food and cooking aren’t exceptions to this. I understand how necessary it is make good choices in food that that I eat and when to do it, but I have noticed my desire to care about what I eat and cooking in general is at an all time low. What’s most interesting about that fact is that I got very good at cooking and would consider it an important step in understanding what discipline is. The only way to describe my relationship with both food and cooking is damaged. The soul of the artist has been suppressed by both strength training and the challenge the economy has given in 2022. It is there but the disconnect between it and the rest of what makes me whole.

If I was to rank where activities that would fall under the hobby category in 2017, golfing would be number 1, cooking number 2 and strength training number 3. There was a point where cooking was clearly at the top of that list. That would have been about 2010-13. I was putting in the work to become a better cook from that time frame that I am now to strength training. I was following all the steps I outlined in the The Road to Discipline. I began letting out my “inner french chef” and cooked food from different cuisines. That led to learning yeast breads, canning, barbecue, deli style meats and candy. My smoker, a barrel grill with side firebox, has about 13 years of smoke accrued on the inside of it. I would never claim mastery of baking, canned jams and salsas or smoked meats, but I made significant strides in cooking skill in that time. That gave me a high level of pride in being able to make food from scratch that was available mass produced. It made me want to make everything I could from scratch as a point of pride. As a result, I haven’t eaten a lot of food items are are commonplace in American tables in awhile. I know I am very capable of producing high quality scratch food because I do it now, just not as often.

It was around 2013 that I reached my highest bodyweight that I know of. I was somewhere around 330 pounds. I owe that to my letting out my inner french chef. French cuisine can be very high calorie by nature because of the importance of sauces on the plate. They are the central food item on the plate or in the bowl. This alone doesn’t differentiate this type of cooking from Mexican, Tex-Mex, Chinese, Italian, Caribbean or any of cuisines deemed American. What does is that a lot of the sauces involve relatively high fat content from dairy products, which have added sugar, and wheat flour, which is central for the creation of gluten. There are numerous ways of getting around those 2 central sauce making ingredients now but in in 2010-13 what I used for sauces was heavy whipping cream or half and half for cream based sauces in addition to the butter needed to make the rues for them. I did that kind of cooking 3-4 times a week. I ate well and and banked a lot of skills I still have to this day but the cost to my enjoying it was weight gain.

My starting to lift at Aspen in June 2013 didn’t change my eating patterns that much. I was still doing vendor shows selling canned jams, jellies, sauces and whatever else I thought would be interesting to people. That took me down very deep rabbit hole. The kind that people who are both good and creative can get into a lot of trouble if they aren’t careful. Some of my worst culinary fails are hilarious successes that sound like bullshit but are true. The best one is when I tried miserably to make fudge and ended up making fudge flavored taffy. Seriously amazing. It tasted so good. To this day, I don’t know how I made it and couldn’t repeat it. I expanded what I sold to meats every now and again. By this time I was doing 8-10 briskets a year, some cured and some not. That doesn’t sound like a lot, but 1 whole smoked brisket is enough to feed one person for 2 or so weeks if they are eating it everyday. I had most aspects of barbecue down. What ended this phase of my culinary development was not being allowed at a vendor show because of a lack of proper paperwork and such to sell to the public. I believe this was around 2015. I was very bitter about that at the time because I saw cooking something to be really passionate about. Canning is a very long process and doesn’t let up once it’s started. Vendor shows competed with golf for time. Looking back now, my selling food at vendor shows wouldn’t have lasted much longer than it did. What the person who reported that I didn’t have proper documentation for that vendor show in Ankeny, Iowa that day in 2015 did was put the bullet in my culinary dream’s head.

By 2015, my weight had gone down significantly. It is owed to my lifting serious, the massive amount of cardio I was doing at work and gym and a diet change. Working 10-12 hour days and lifting for more after that makes finding time to cook challenging. I reached my lowest weight in January of 2016 when I took the month off from lifting and put in at least 140 miles jogging or running on a treadmill. I distinctly remember eating only chicken and fish or seafood as protein for that month and realizing that it was too expensive to keep up. I firmly believe there are only 2 motivations for eating: eating for enjoyment and eating because it’s necessary. The latter has become more dominant in my life since I moved into my house in July 2016. That’s an important date because I got a lot more serious about strength training after that. Time got a little shorter to really get into the enjoyment side of cooking and eating, but the pride remained.

When the public place lockdowns took effect in April of 2020, the first signs of what is happening now were noticed. I’ve written about the crazy long days at work in 2020 enough so I won’t repeat it in full. One of the main effects it had on me was it destroyed all of my eating habits and replaced it with what was happening, which was eating far too much bad food on the run. It likely aided in my body weight getting to at least 304 pounds by the end of August. I know that is accurate because I remember seeing it on the scale at the gym. The same pattern followed into 2021. It calmed a bit down towards the fall of 2021 but my current line of training kicked in at the same time. I have maintained 280-285 since the start of 2021. I know for sure strength training was the major force behind my change to a more simplified cooking and eating strategy. No use of more than 2 pans except on a weekday to make food for work because it caused too many dishes. Sauces like the ones used in a Chinese dishes, which is what I tend to make, cause a lot of dishes to pile up. It’s just another thing a single person doesn’t need to deal with. So I let it drive my cooking habits. The chef in me would be disappointed by that but the lifter in me just calls it the cost of doing business.

I am lifting heavier than I ever have before and more consistently week-to-week than in any previous year. What hasn’t been as consistent has been the hours at which I have been lifting. I have spent time going to the garage or the gym directly after work without stopping at home. Other times I have stopped at home and posted a blog entry to simply get it out earlier because I know it will be 8-9 pm before the entry goes live if it’s not done that way. In that way, I have also prioritized the blog above cooking or eating. I know if I don’t get to the garage before 4 and 5 pm I won’t be eating till probably 7-8 pm. It’s just too late to cook anything at that point. The 4 am alarm doesn’t help, either. It puts me back in the boat I was rowing in 2020/21. I have noticed my body weight trending heavier over the last couple months. It’s not by a lot but it’s enough to take note of. I last weighed myself at 288.6 pounds a couple Saturdays ago. I just have to make a concentrated effort to get my training sessions in right after work so I can actually give myself a chance to make some kind of dinner at a reasonable time. That will also give me a bigger window of opportunity to write before getting to bed at a responsible time. It also means blog posts will come out in the evening or I just have to plan ahead and release them truly on a set schedule. I know what I need to do in this phase.

The other part of the disconnect with cooking is the effect the inflation is having on, well, everything. I’m not sure what the ratio is of strength training and disposable income on my desire to cook. I still do make sure I eat mostly well but my diet does wander quite a bit within those constraints. There’s one central truth rearing its head in that conflict. I have already paid for my stuff in the garage. I have very little to add to it currently so strength training isn’t costing me anything to do it daily. Cooking and eating is an everyday expense that has to be calculated and accounted for. That is why I cook quality food in higher quantities on Saturday or Sunday to prepare lunches for the week and maybe a single one off dinner. The latter really does feel weird to me. I know a few ways around eating fairly well without the cooking and the mess it entails. Getting in on a pre-made meal program would be the most logical way to do it. That idea has a significant mountain to climb over before I buy into it. I’ve given it away multiple times already in this entry. My pride as a cook is extremely high because I have shown the ability to be relatively self sufficient in culinary needs. The cook in me would have to be completely broken in me to choose that as an option. The lifter may be dominant psychologically but I learned the discipline of cooking before I learned the discipline of strength training. The soul of the cook has just been subjugated to the role of support.

The other option satisfies my pride as a cook but is probably more expensive on the whole. That is to meal prep fully. I have the skills to do it but have lacked the motivation because it is quite a large commitment. The plan would be to use my smoker to cook an inordinate amount of various proteins on a Saturday or Sunday and seal them in vacuum bags. It would hardly be the first time I’ve smoked a lot meats at once. In that way, I’d have my proteins already paid for making them “free” in the way that strength training is “free” for me. The rice, potatoes and vegetables would be a recurring cost until I need to smoke more meat. The day-to-day eating would come done a bit in cost and put a dent in any variety I have, which I have never minded. The initial cost on the meat would be fairly expensive because of increased prices. Odds are it would be either pork, chicken or turkey. Beef and I don’t get along too well these days, but a brisket would go a very long way. My writing this shows I have thought about it, but not acted on it yet. It’s probably time to just do the logical thing.

The soul of the artist within me has become disconnected from the “rest” of me primarily because of increasing economic constraints and strength training’s time sapping nature. That has damaged my relationship with food, cooking and eating. Pete told me I wasn’t eating enough when we got on the topic of food last week and that raised my awareness a bit. He knows that that it’s on when I’m at work. I do have a heavy tendency to barely eat while at work. It is something I need to work on. Eating and food is central to health and growth, especially muscular development, so I know this is a disconnect that happens everywhere. It is especially so when the pride in the soul of the artist is an almost insurmountable opponent. Being able to produce high quality food on command definitely gives me a tremendous sense of pride. That also makes it a potent enemy if I let it be that.

Equipment Review: RML-390F

Bonus Review of Rogue Fitness SML-2 90’

Mark Brown

July 19, 2022

It’s about damned time I do this review. I have had my power rack in its current state since the middle of October 2020 so I have given it enough time to give a healthy review. It started out life as a squat rack, specifically the Rogue Fitness SML-2 90’, then got converted into the RML-390F (short for Rogue Monster Lite). The squat stand worked well for what I needed at the time of purchase in July of 2020. I will detail that information below. It was literally the first piece of gym equipment I bought. It was a major step towards my current collection of equipment. I never thought I’d have a home gym. It all started with the power rack.

The SML-2 came about because Pete had one of those all-in-one cage Frankenstein type racks. It worked well enough for the first couple months of lifting from March till May. We both noticed the effect racking the barbells did on it. I decided to get a sturdy rack that could be used for squatting and benching. We were doing leg days together at one of the Genesis we are both members of. I decided that squatting during the week would take some pressure off the leg routine on Saturday mornings because we both knew how busy it could get. It did the job admirably, especially after the spotter arms finally came back in stock. They had been out for a few months, like everything else. The big thing I remember about it is that the rack is quite light. Pete used a couple heavy bags to weight the back support down before I got some plate storage pins. I distinctly remember almost tipping it doing 225 pound banded pin pulls. That’s when I learned about counterbalancing a rack. Plates stayed on it at all times after that.

There were a few reasons to transition to a full blown power rack. The first was that plate storage was a pain the ass. The size of the spotter arms made it difficult to place the storage pins and vice versa on it. I needed a rack that could store plates permanently without moving them every damn time. The second is that that I was moving into a phase of lifting where I needed more safety from my rack. The spotter arms work well, but to have safety pins and be fully inside the power rack structure is much safer. The third is that are vastly more options for the full rack than the squat rack, most notably the safety straps. The squat rack was a good piece of equipment to start with and a worthwhile investment given the budget and need.

Pin pulls in the SML-2 90′. Easy to see how the spotter arms interfered with the storage pins.

I briefly thought bout upgrading to a half rack, but ultimately the transition to a full rack was the best choice. The end result was the RML-390F. It is the only one that Rogue makes that is flat footed. A vast number of their power racks have feet with the lower horizontal support beam about 3 inches from the ground. The difference between the flat footed and regular footed more effects bands because there’s an extra space for them to wrap around. The flat footed nature of the RML-390F means bands can only be used in correlation with pegs that push through holes located in the support beams. They can be a pain to get the bands on to them as a result of them being so close to the floor but it’s ultimately not that annoying.

The main thing the power rack gives me is the ability to do a wide variety of lifts safely at max effort and intensity solo. It does that through being a well constructed rack that has a lot of attachable extras. It’d be very easy to go nuts and get a lot of them. I got the spotter arms, safety straps, handles, and a land mine in addition to the safety pins that came with the converter kit. Max intensity and max effort squats and bench presses are made safe by heavy duty J cups, safety pins and safety straps. The pins allow for partial range of motion movements on presses or squats that are designed to concentrate effort on the concentric part of the lift. The pins allow for pulls that take the quads almost entirely out of the lift to emphasize the back, glutes, hips and hamstrings

The holes for the band pegs are in the middle of the rack and at the end. The band peg holes on the end are almost exclusively for banded deadlift work, which I have only recently started adding to the program. The band peg holes in the middle are for banded bench press, squat or pin pulls. Bands are really helpful, especially when training lockouts. For band work on the vertical supports there are holes all the way up them for the other attachments. One thing to remember about using bands in a rack is that enough counterweight is needed on the other side of the rack to not tip the rack so that the banded pin pull I referred to earlier doesn’t happen.

Another thing to note is the 3×3” vertical supports are very strong and can take a serious beating. The structure itself will move with hard racking of weights. It doesn’t move a lot but it might need to be moved back into place at some point. That could be because I during most bench or squat sessions I only have 140 pounds of weight on the plate storage pins. There’s no real way to bolt the the floor if that is what someone wants to do. The 3×3” vertical supports make racking weights a precision task when dealing with specialized bars. Most standard Olympic, Power or Combo bars clear the outside of the frame by half an inch to an inch. Specialized bars are much closer and can really require precision when racking without hitting the frame. Racking the weight with my EliteFTS American Cambered Bar and Fat Grip EZ Zig Zag bar, aka “wavy bar” on my training logs, is made harder because the plate sleeve on those bars starts so close to the outside edge of the vertical supports. There are ways around this but they are not great pairs with this rack as constructed.

This rack best performs with standard length barbells in general. Some specialized barbells it just won’t work with at all. The Rogue Fitness Cambered Bar I own doesn’t really work inside the power rack itself because the bar’s design doesn’t allow for the safety pins in while doing full reps either free or with a box. That goes for both squats and bench press lifts so I perform both of those lifts outside the safety of the power rack. Once again, there are ways to help those lifts be safe as possible but not as the rack is both constructed. I would have to get a Monster series rack to make the Cambered Bar work inside of a rack.

I can see myself with this rack for a long time. I can also see myself going for a Monster series rack with more plate storage options just as easily. The RML-390 is a good rack that will serve a lifter well, like it has me. They are easy to add more supports onto to make a series of cages. If someone out there is looking for a Monster Lite series rack, then one of the footed racks is probably a better option. However, if they have a SML-2 already, the conversion kit to the RML-390 is a very good way to go. I have probably $1,600 +/- $100 total invested in the RML-390 I use in the garage. There are definitely add-ons that I am tempted by. Rogue Fitness is good as what they do. A good power rack is a major investment. Expect to put in at least $1,000.

2022 Week 28 Training Log

July 11 – 17, 2022

Mark Brown

July 18, 2022

Monday
Box Squat, Cambered Bar – 175 x 8, 225 x 6, 265 x 6, 315 x 6, 355 x 3, x 3; 375 x 3, x 3; 395 x 3, x 3; 415 x 2
Good Mornings, Cambered Bar – 135 x 8, 175 x 6, 185 x 6
Leg Extensions – 110 x 10, 130 x 10, 150 x 8
Banded Pin Pulls – 245 w/70 lb bands x 6, 265 w/70 x 6, 275 w/70 x 6, 295 w/70 x 6, 315 w/70 x 3
Calf raises – 335 x 25, x 25, x 25, x 25

Tuesday
Scheduled Day Off – Recovery
2 miles walk – 40 minutes

Wednesday
American Cambered Bar Press, Inner Grip – 138 x 6, 158 x 6, 178 x 6, 188 x 3, x 3
American Cambered Bar Press, Narrow Grip – 138 x 6, 198 x 3, x 6; 218 x 3
American Cambered Bar Press, Third Grip – 138 x 6, 198 x 3, x 6; 218 x 3, x 3, x 3
American Cambered Bar Press, Wide Grip – 138 x 6, 198 x 3, x 6; 218 x 3, x 3, x 3; 228 x 3, x 3
Incline Dumbbell Press – 100 x 8, 110 x 5, 115 x 3
Seated Overhead Dumbbell Press – 55 x 12, 60 x 12, 65 x 10, 70 x 8
Bent Over Rear Deltoid Rows – 10 x 20, 15 x 20, 20 x 20; 25 x 20

Thursday
Triceps Pushdown , Pronated Grip – 45 x 15, 55 x 15, 65 x 12, 75 x 12, 85 x 12
Preacher Curls, EZ Curl Wide Grip – 45 x 20, 65 x 20, 85 x 15, 95 x 12
Muscle Mace Giant Set – 45 x 10(x 8)(x 10), 45 x 10(x 8)(x 10), 50 x 10(8)(x10), x 10(x8)(x 10)
Preacher Curl, EZ Curl Narrow Grip = 95 x 12, 85 x 15, 65 x 15, 45 x 20
Skull Crushers – 45 x 20, 65 x 15, 75 x 12
Standing EZ Curl Bar Curls – 45 x 12, 65 x 12, 75 x 10
Single Arm Pushdowns, R then L – 10 x 12(x 12), 15 x 12(x 12), 20 x 15(x 15), 25 x 12(x 12), L only 20 x 15, 10 x 15
Standing EZ Curl Bar, Narrow Grip – 75 x 8, x 8, x 8, x 8, x 8

Friday
Scheduled Day Off – Recovery
2 Mile Walk – 38 minutes

Saturday
Prone Leg Curls – 65 x 12, 80 x 12, 95 x 12, 110 x 10
Straight Leg Deadlift 135 x 5
Clean and Push Press – 135 x 5, 145 x 5, 155 x 5, 165 x 5, 175 x 2
Barbell Hip Thrusts – 225 x 10, x 10; 245 x 8, x 8
Dumbbell Squat – 95 x 12, 100 x 8, 105 x 8, 110 x 8, 115 x 8
Isometric Back Rows, Machine Per Hand – 90 x 8, 100 x 8, 110 x 8, 115 x 8
Cable Rows – 35 x 12, 42.5 x 12, 50 x 12, 60 x 12
Leg Press 478 x 15
Calf Raises, Leg Press Machine – 100kg x 50, 120kg x 40, 140kg x 30, 160kg x 30

Sunday
Banded Bench Press – 135 w/70 lb band x 6, 205 w/70 x 6, x 6; 225 w/70 x 6, 205 w/100 lb band x 3, x 3, x 3, x 3
Narrow Grip Incline Press – 235 x 3, x 3, x 3, x 3; 245 x 3, x 3
Pin Press, 2 inches off chest – 225 x 6, 245 x 3, x 3
Tricep Extensions, Wave Bar – 75 x 10, 75 w/chain x 8, 95 w/chain x 8
Lat Pulldown, Neutral Grip – 91 x 8, 116 x 8
Lat Pulldown – 90 x 12, 115 x 10

Steps/Miles
Monday – 23,876 steps, 10.7 miles. Tuesday 25,641 steps, 11.6 miles. Wednesday – 25,004 steps, 11.4 miles. Thursday – 23,652 steps, 10.7 miles Friday – 28,554 steps, 13.1 miles. Total – 126,727 steps, 57.5 miles.

Notes

AppleWatch is on the fritz so steps/miles count probably won’t be part of the training log until it gets fixed. Unless I go on vacation, the numbers should be reasonably close to these. It’s also a good way of showing my work week in terms of steps without doing the math of dropping the weekends.

This third week of banded press went well. I have a much better idea how to approach the next 3 week wave of the lift. That will probably be in 9 weeks. There was perhaps too much volume done and a little too light. I found the weight and band tension that wasn’t worth doing (225 w/100 pound bands). Bar movement was too slow. I will make necessary adjustments by the next time I do banded press.

I didn’t finish the 3 week wave on straight bar squat. It’s just too much on my pressure on my shoulders and bicep tendon. I decided to not risk doing what I did to my tricep the week prior. As a result, I put up the heaviest rep on the cambered bar. I am really getting the hang of it.

Clean and Push Press is becoming part of the regular lifting pattern. The emphasis on hip development is having a positive impact. I didn’t do Viking Press on Sunday as a result of doing clean and press Saturday.